Leave Groups and Leave Types
Updated At: 2023-09-04
- Manage Leave Group : You can manage different types of leaves in groups.
- Add Leave Type : You can add multiple types of leaves in one group.
Note
To accrue leaves to employees, see Leave Accrual.
To add leaves to employees, see Add Leave.
Web
① Manage Leave Group
You can create leave groups to manage different types of leaves in groups.
You can check the amount of remaining leaves and used leaves in groups.
STEP 1 ) Go to Manage > Leave Groups > + Add Leave Group from the menu in Web Manager Mode. 
STEP 2 ) You can add new leave groups here. Use Negative Leave Balance Limit feature to limit the use of leaves for ‘Create Leaves Request’. 
- No Limit : Employees can send create leaves request without any limit.
- 0 day : Employees can send create leaves request up to remaining leave days.
- e.g. 5 days : Employees can send create leaves request exceeding remaining leaves up to -5 days.
You can also add multiple leave groups at once using Excel.
Click Upload button on the page and download the Excel file provided. 
Make sure to add leave groups in the correct format and save the file. 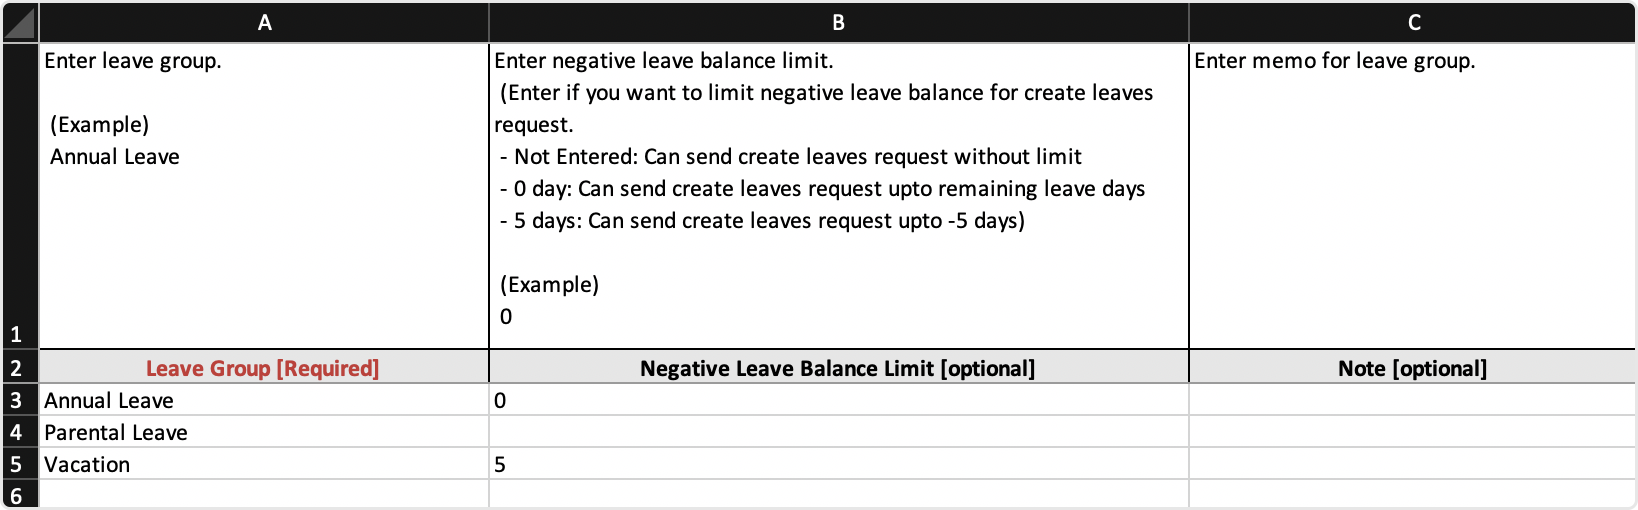
Upload the file by clicking on the Upload Excel button. Values in invalid format will be displayed in red on the upload preview page. Double click and correct the errors to complete the upload. 
② Add Leave Types
You can add different types of leave to best reflect your company's leave policy.
STEP 1 ) Go to Manage > Leave Types > + Add Leave Type from the menu. 
STEP 2 ) Enter the information below, then click Add button.

① Leave Group : Select a group for the leave type. If not, select ‘No Leave Group’.
② Name : Enter a unique name.
- Display Name : This option appears only when ‘Display Name Feature’ is set to be used from Company Settings - Leave. Enter a name to be displayed to other employees when using this type of leave.
③ Team/Location, Position : Select certain teams/locations and positions to allow the leave type only to them.
e.g ) If ‘Head Office’ is set to be used for this leave type, only employees in ‘Head Office’ can use it when creating a leave request.
④ Time Option : Select Enforce Time option to set a leave for a partial time of a day. You can enter the start and end time for the leave. Select All day option to set a leave for a whole day.
⑤ Paid Hours : Enter paid hours admitted for the leave.
⑥ Deduction Amount : Enter the number of days deducted from taking the leave.
Enforce Time Option (Only available when using ‘enforce time’ option)
• Time Fixed Option
• Fixed by Paid Hours : When an employee requests this type of leave, the end time is automatically set(including break time) based on the paid hours set when the start time is entered.
📢 Time Fixed Option - fixed by paid horus
The end time is automatically set, including the break time set in [company settings > break time].
For example, if you enter 9:00 as the start time of your leave, the end time of your leave will be automatically set to 13:30(30 minutes break automatically reflected for 4 hours of work)
• Not Fixed : If you enter the start time as the ‘default hours’ set, the end time will be automatically set(not including break time), and employees can freely set the start and end times.
📢 Time Fixed Option - not fixed, paid hours to 4 hours, default hours to 5 hours
If you enter 9:00 as the start time of your leave, the end time of your leave will be 14:00(5 hours of leave automatically applied, with 4 hours of paid hours reflected in the report.)
• Additional : You can select additional features for leaves with All day time option.
• None : Select for normal types of leave.
• Vacation : Select for a long time off (e.g. parental leave, vacation).
• Off Day : Select for an off day. If employees work on this day, their work will be shown as ‘off day work’.
• Holiday : Select for a day off (e.g. foundation day or if you want to consider a particular day as ‘holiday’). If employees work on this day, their work will be shown as ‘holiday work’.
Off day or holiday option can be useful for shift work where regular working days, off days, and holidays change every week.
Additional Option - Vacation
Multiple leaves with additional - vacation option will be shown as below.
If you delete the leaves, the entire leave schedule will be deleted at once. 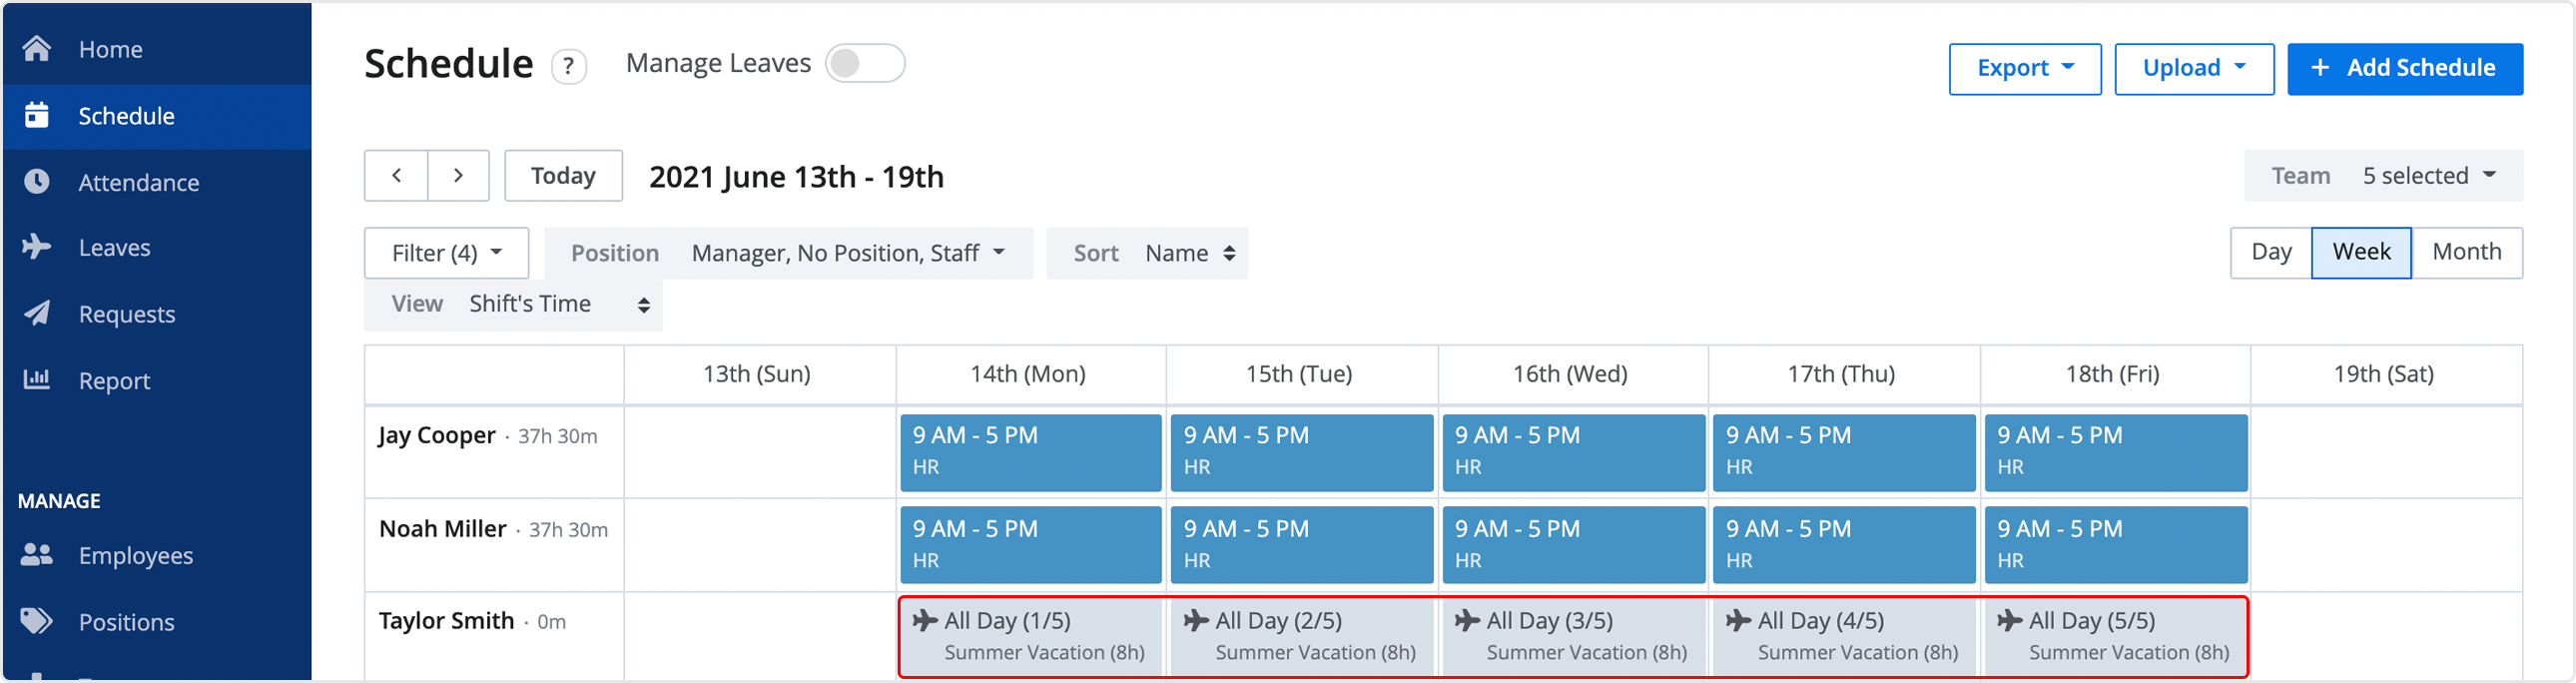
•Minimum Consecutive Days(Available when using ‘all day’) : You can set the minimum number of consecutive days that must be used for leave.
•Maximum Consecutive Days(Available when using ‘all day’) : You can limit the maximum number of consecutive leave days that can be used.
e.g. if you set it to 5 days, you can only apply for a maximum of 5 consecutive leave days.
•Include Holidays in Consecutive Days(Available when using ‘all day’) : You can choose whether to use leave days consecutively, excluding holidays in the middle of consecutive leave days.
e.g. if you do not use the option to include holidays, you can use 5 consecutive days excluding holidays, such as Mon/Tue/(holiday)/Thu/Fri/Sat.
e.g. if you use the option to include holidays, for Mon/Tue/(Holiday)/Thu/Fri/Sat week, you cannot use 5 consecutive days because holidays are included.
•Can Customize Time(Available when using ‘enforce time > fixed by paid hours’)
When requesting to create a leave, employees can enter their desired leave start and end times, and the paid hours and deduction amount are automatically calculated based on the entered time. 
•Confirmation Text Before Clock In
Employees must confirm the information through a pop-up window on days with a set leave type. 
💡 Note
This feature is available from Standard Plan.
•Display Note : Choose whether to display leave type's note to other employees. This option appears when the leave type's display note feature is set in Company Settings - Leave.
•Delete Fully Included Shifts : When requesting to create a leave, if there is a shift that is fully included in the leave time, the existing shift will be deleted. Also, if you change the leave to another day through ‘edit leave request’, the shift on that day will also be deleted.
You can also add multiple leave types at once using Excel.
Click Upload button on the page and download the Excel file provided. 
Make sure to add leave types in the correct format and save the file.
- Leave group entered should be already created in Shiftee. 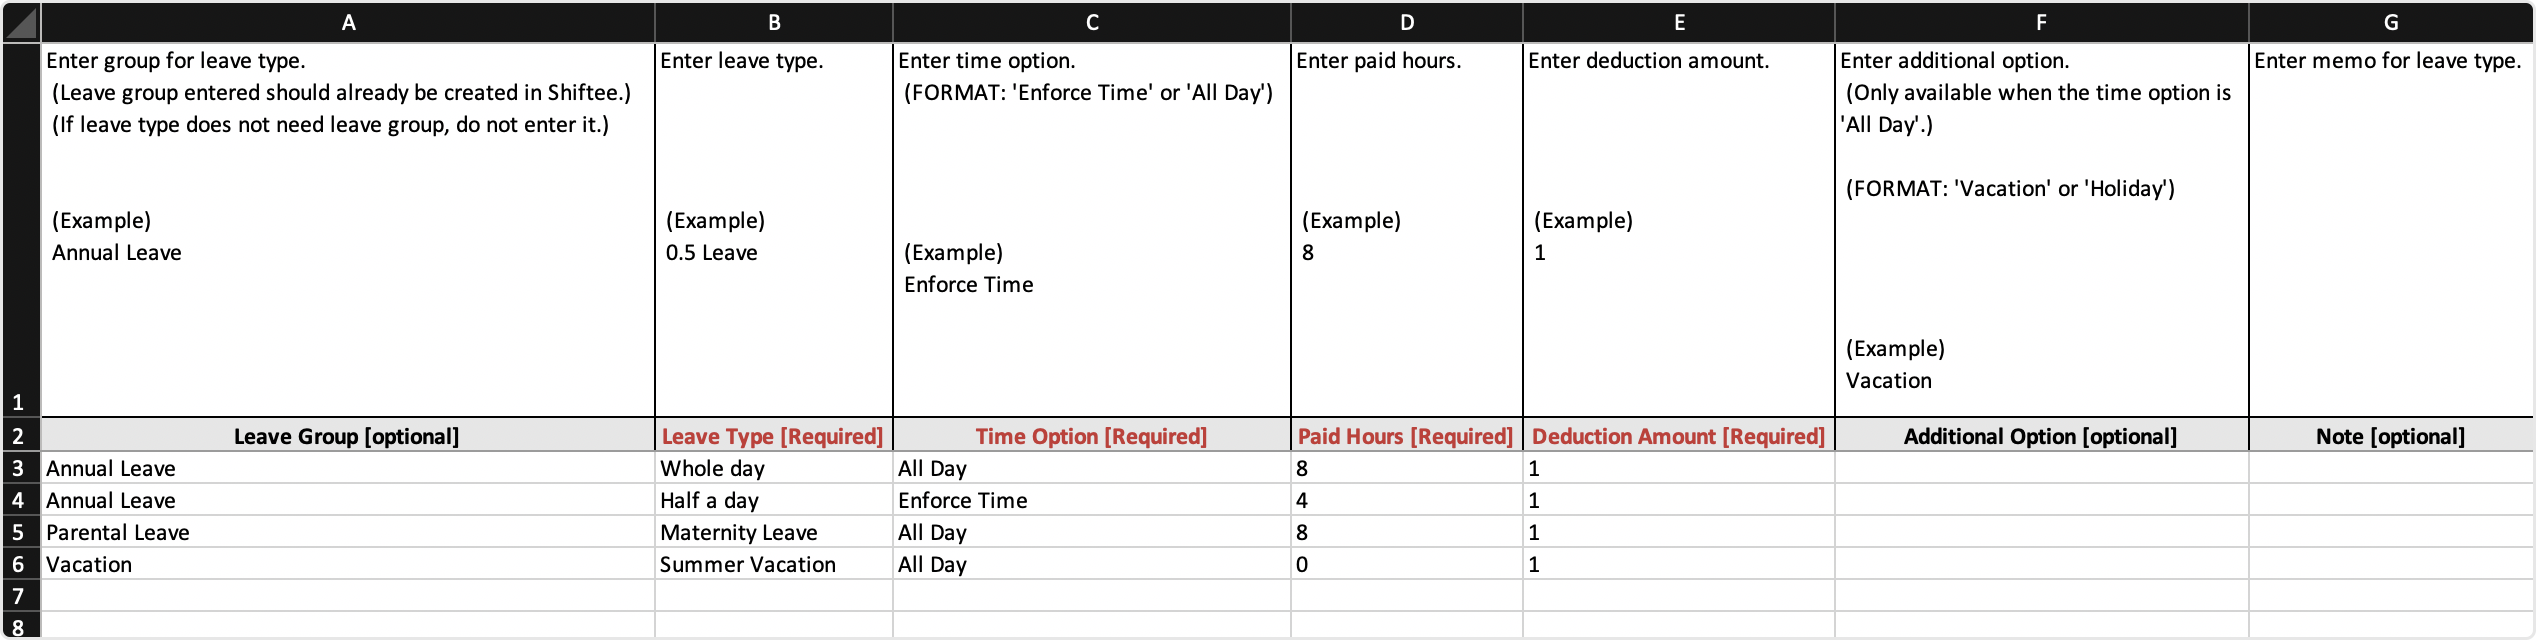
Upload the file by clicking on Upload Excel button. Values in invalid format will be displayed in red. Double click and correct the errors to complete the upload. 
③ Edit Leave Types
Single Edit
Select the leave type from the list. To save the changes, click on Save Changes button. 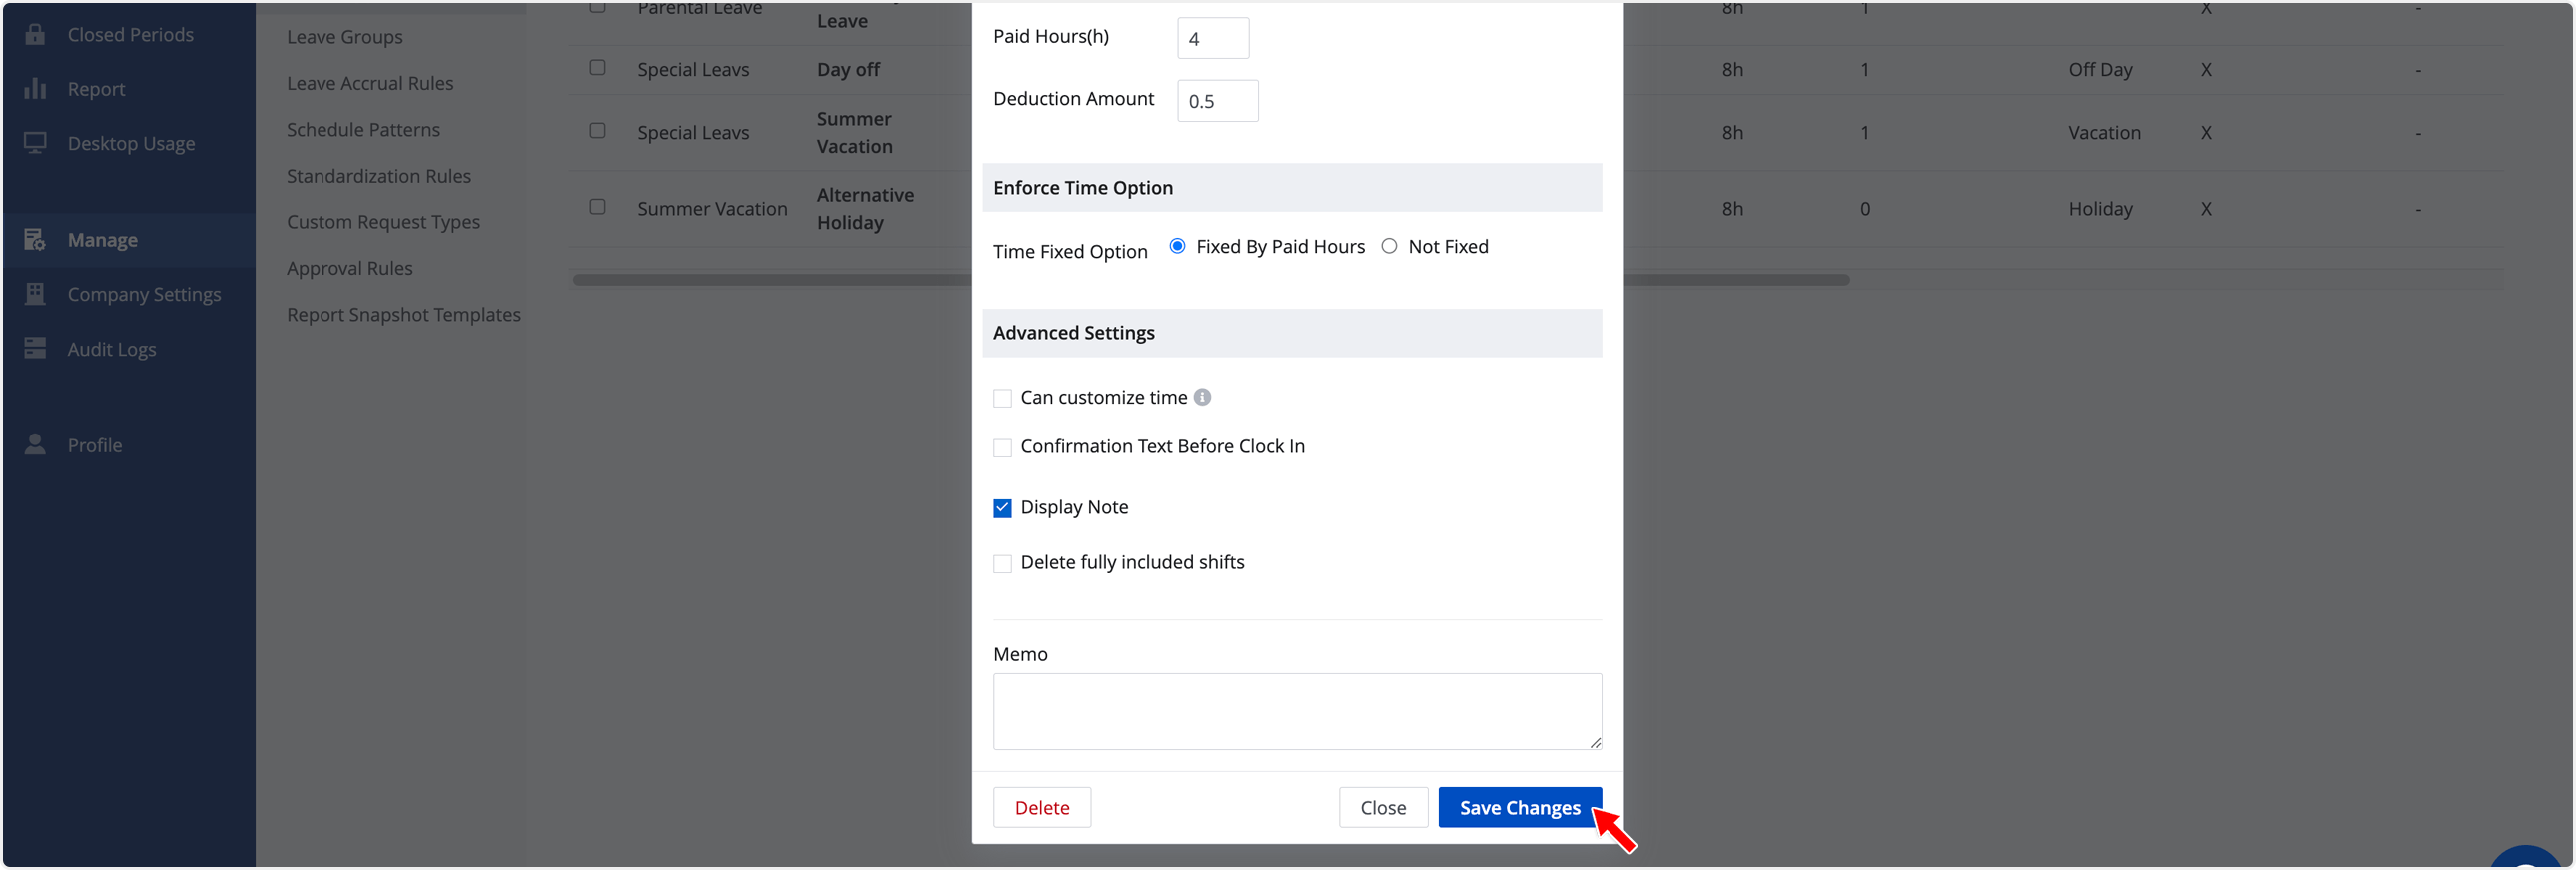
Bulk Edit
Select multiple leave types from the list. Click on the Edit Leave Type button to update the selected leave types all at once. 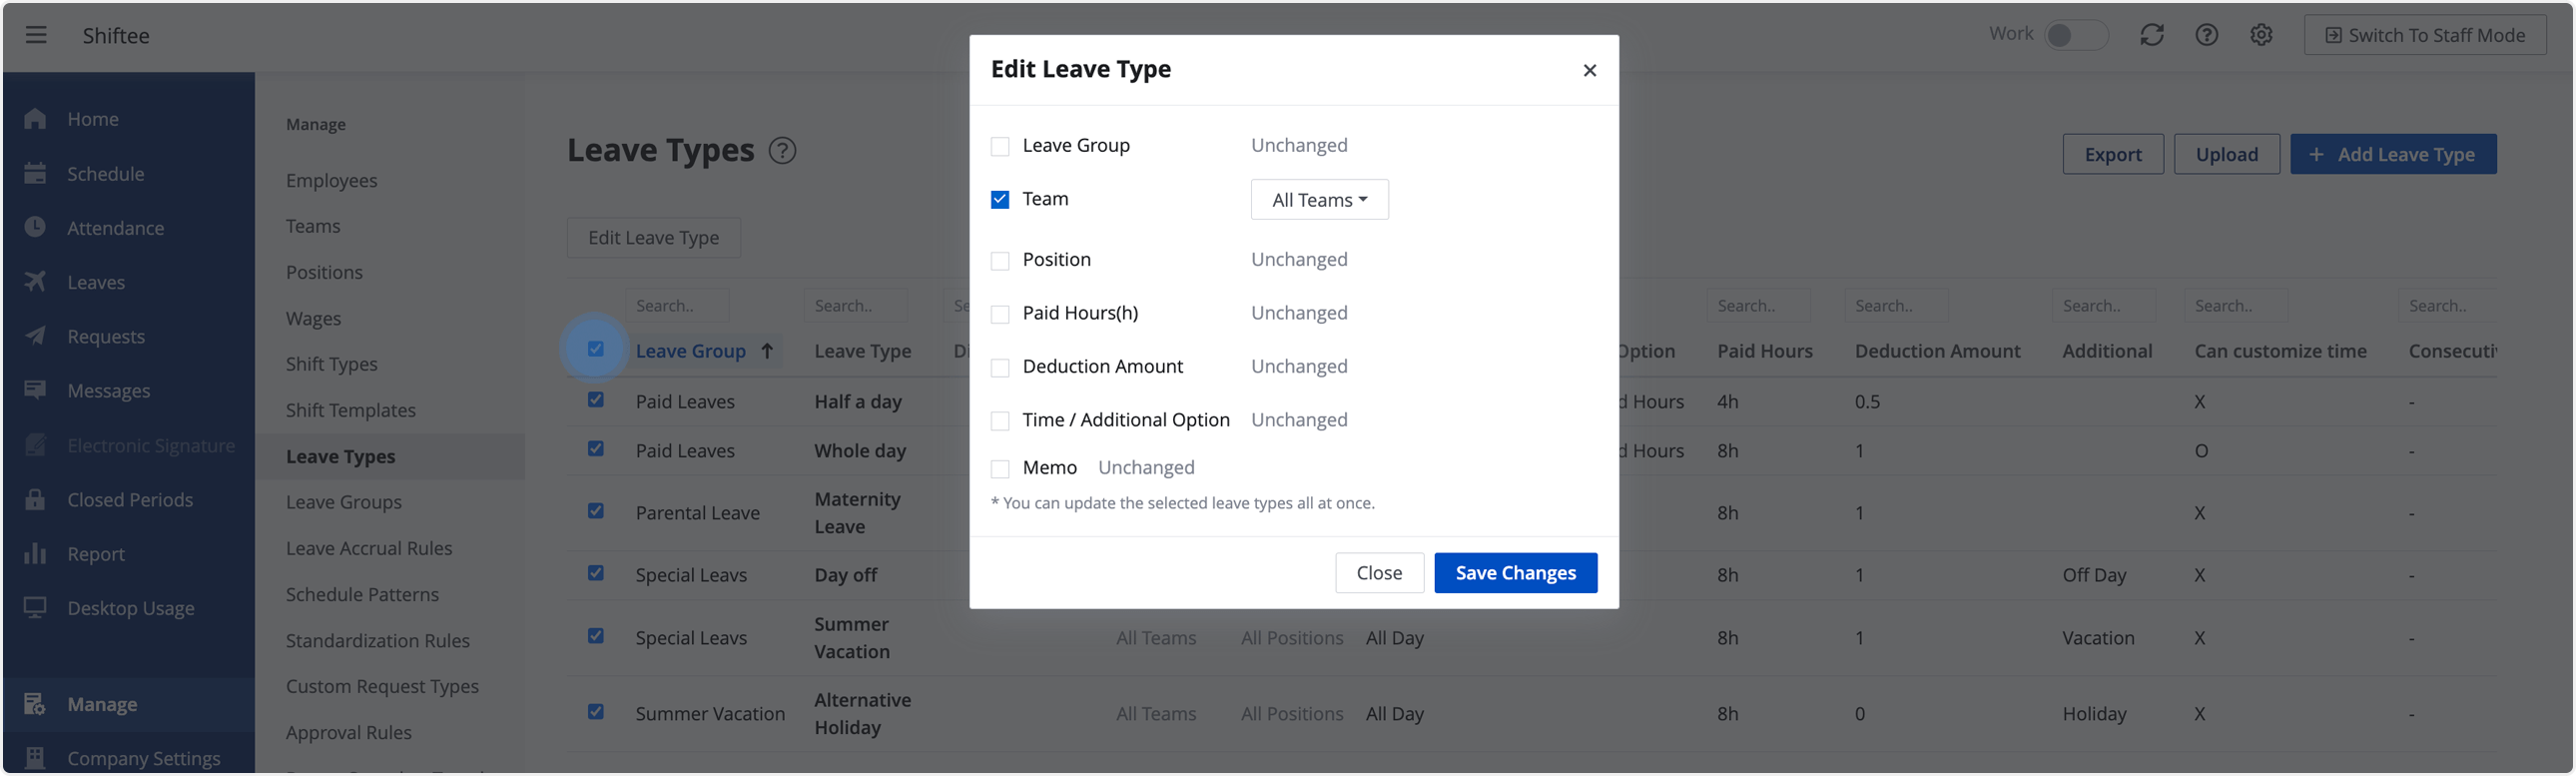
Mobile
Manage Leave Group
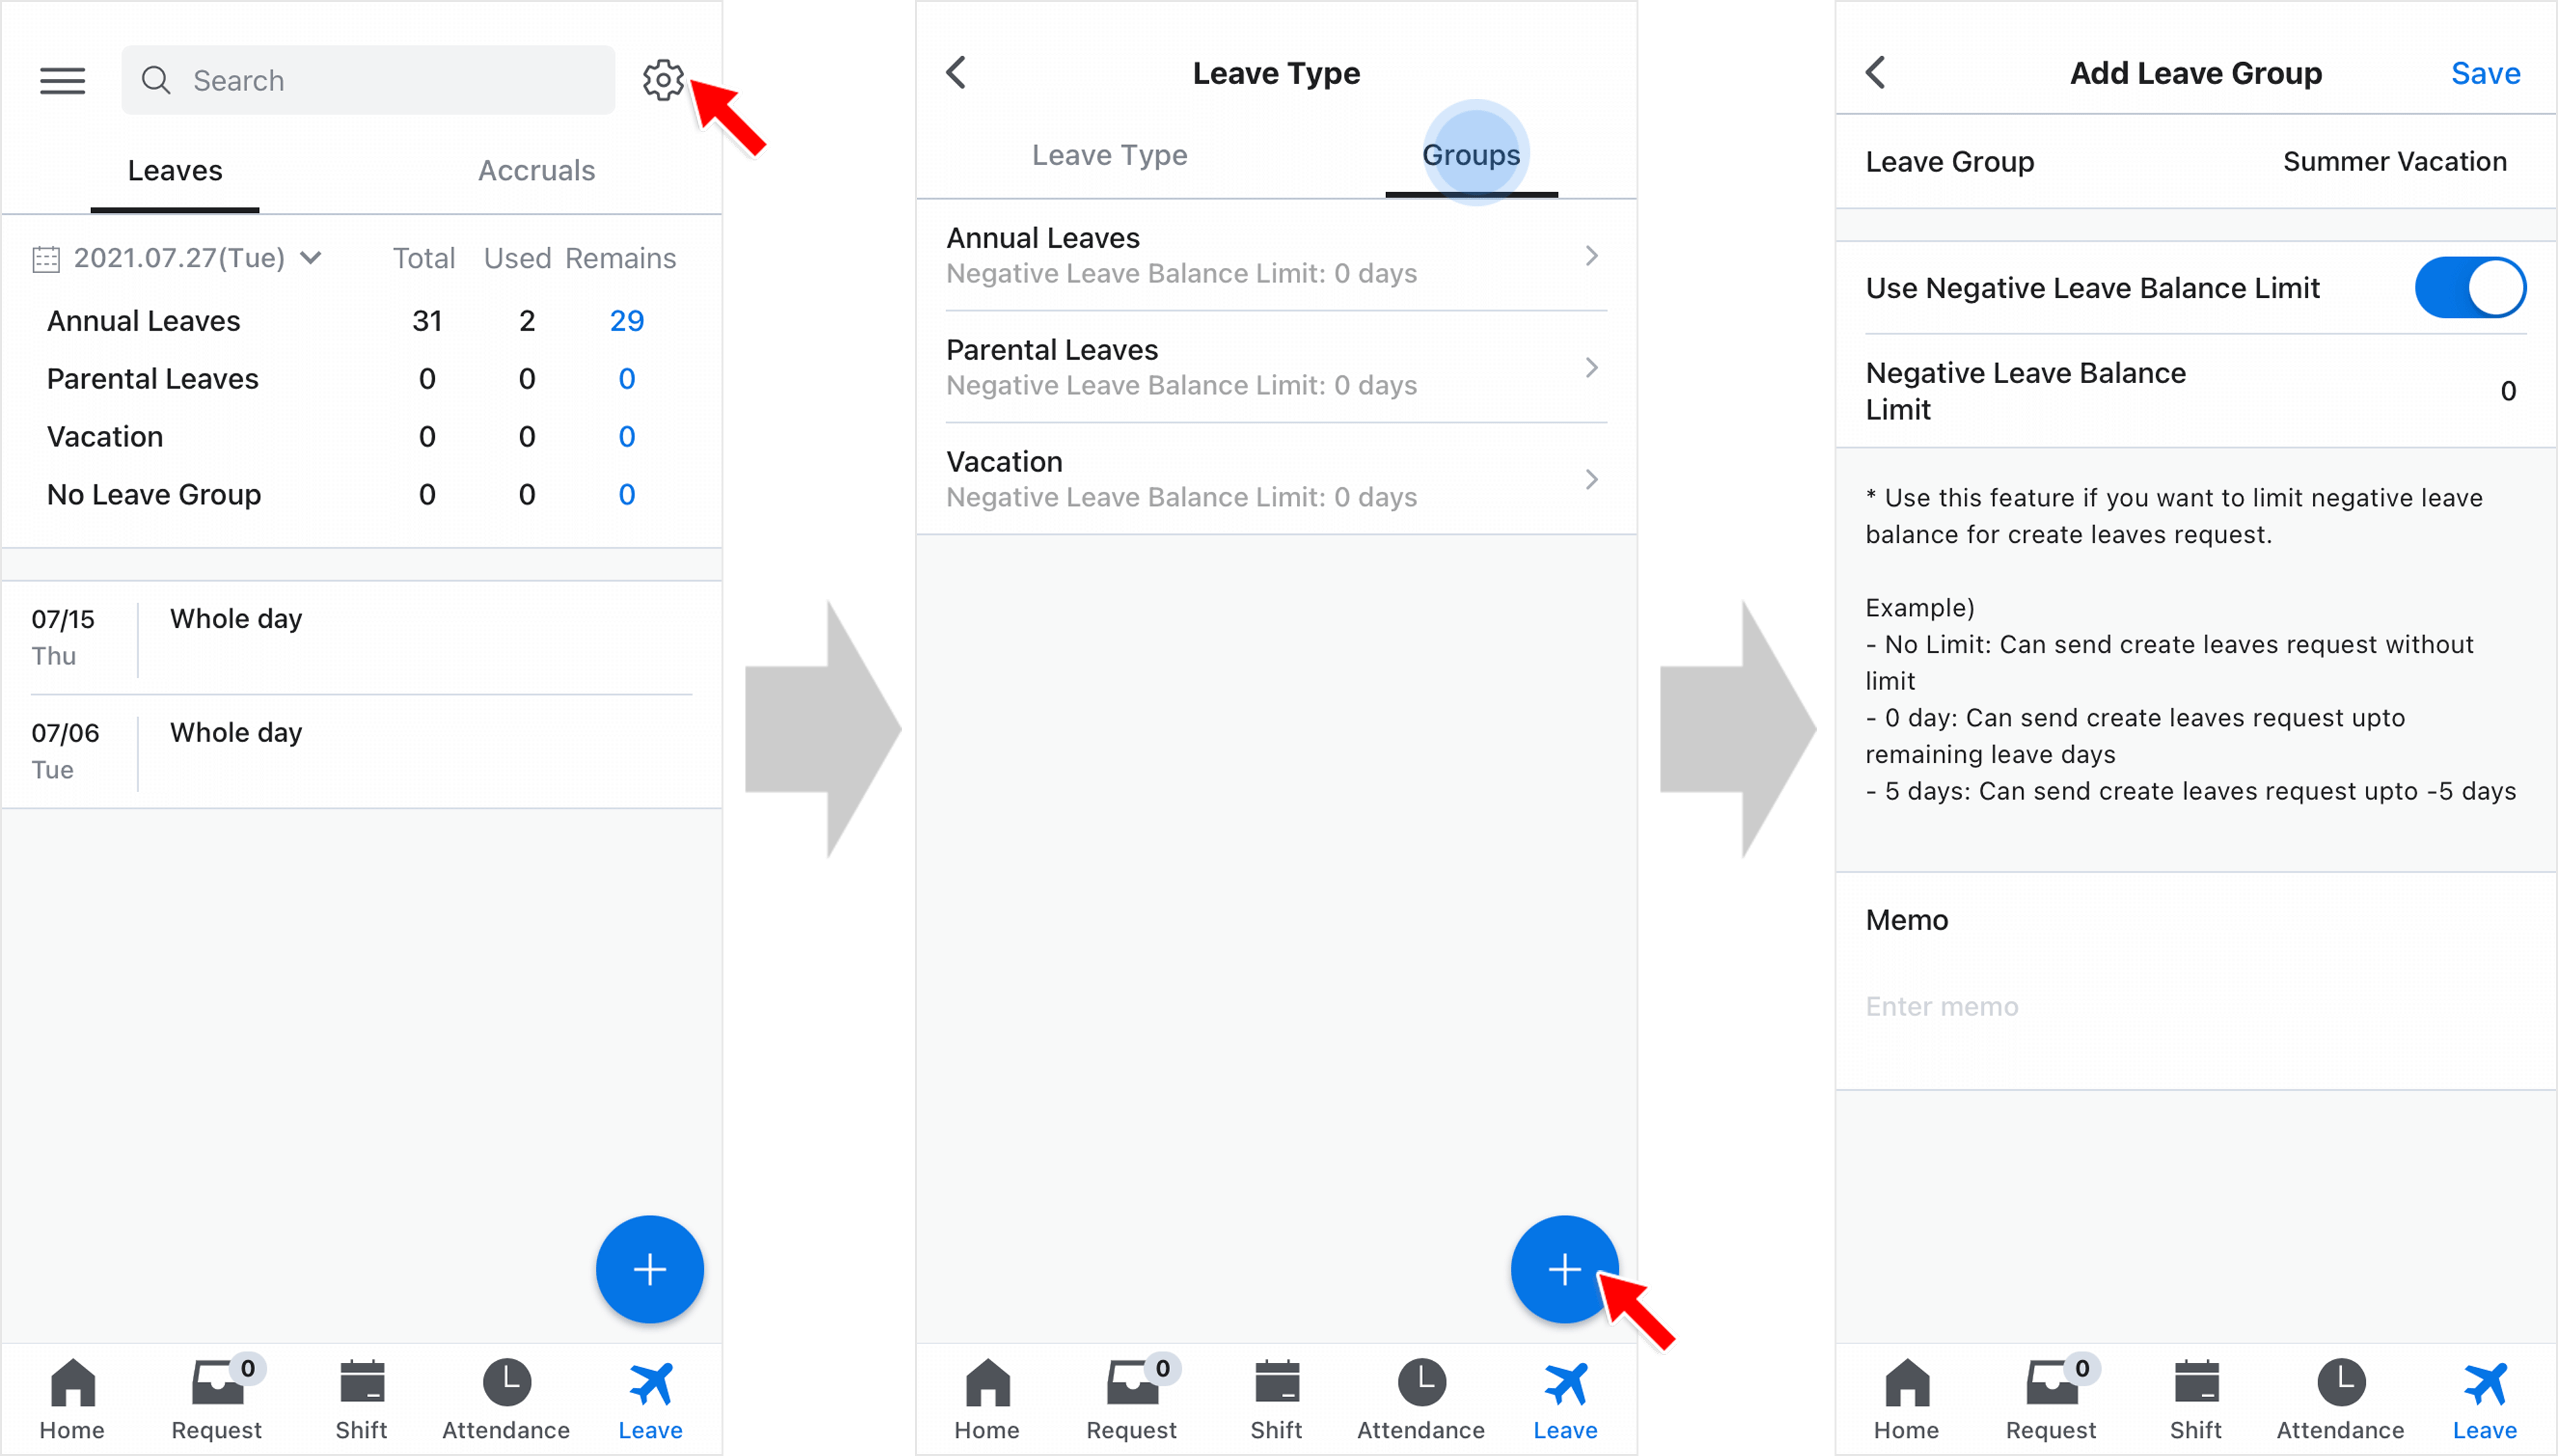
STEP 1 ) Go to Leave on the navigation bar and tap on the settings icon.
STEP 2 ) Tap on Groups tab and tap + button.
STEP 3 ) You can add a new leave group in the mobile app as well.
Add Leave Types
STEP 1 ) Go to Leave on the navigation bar and tap on the settings icon.
STEP 2 ) Tap on Leave Type tab and tap + button.
STEP 3 ) You can add a new leave type in the mobile app as well. You can also edit a leave type from the list.